
Today I bring you a dainty DIY -- surprise, surprise, another wedding project! My idea came from this pin, originally:
 |
| (via) |

Floral wire runs about $4 at Michael's, if you know a man you likely have free access to pliers, and..well.. I hope you have a pen. Not pictured: 8 feet of plain necklace-type chain, from Michael's, and a "jewlery kit" (with the little claspy-things), each $4.
Total for this project: $12.00 (for 5 bracelets!)
SO, here's how you do it:

1.) about an inch up from the end of the wire (I like to leave it on the roll until a later step), wrap the wire around the pen (like above). This gives it a nice rounded form. (and ignore my stress-cuticle in the above photo.. O_o.. gross).

2.) Move the pen adjacent to the first loop, and make a second loop. Make sure that both pieces that will form the "tails" of the bow are on the same side of the wire that crosses over them. (You can see in the above photo, both parts of what will be the "tails" are on the back side of that wire that's the bottom of the loop).

3.) Take the tails and cross them. In #2, you'll see they are running parallel. Just make sure they point on opposite sides of the "loop" they belong to. Does that make sense, at all? Then, take the "tail" that's still connected to the roll of wire, and bring it up and "over" the loops (see above photo), and then bring it back down behind it (this forms the central "knot").. like this:

4.) Ta-da! bow. Cut off the rest of the roll of wire. I then use the ridges on the nose of the pliers to file down the tips since cutting can make them pretty sharp. I then used a combo of my fingers and the pliers to flip the tails of the bow out a little bit. I liked the way it looked better than the straight one.
5.) (Not pictured) I cut the long chain to what I thought would fit a wrist (and fixed it after fitting it), and assembled the clasp/loop. I then strung it through both sides of the loops of the bow and, voila:

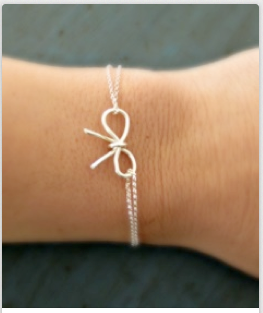
Bow bracelet! I only hope I guesstimated the sizes for the girls correctly. It's hard to visualize someone and then try to picture their wrists. :-/ .. worst case scenario, it doesn't fit, and I take it home to my "shop" to remedy it quick with another strand of $4 chain.

I just wanted to say something about my DIY's. (Mostly before I do a post about how I'm going to hand-calligraphy all of the invitations and you all think I'm nutty). I'm sure some people may look at the long list of DIY's under the wedding tab and think I'm a perfectionist, or that I obsess over the details. I know nobody (or very few people) will notice the writing on the envelopes. I'm sure not a lot of people will appreciate the time that went into the escort cards. And honestly? Escort cards could have been done WAY quicker, but that's not the point. The point, for me, is that I absolutely love spending time on wedding-related DIY's.
I like being creative, I like making things... I'm also (obviously) really excited about the wedding and marrying M. I also know the day itself will go by quick! I use this time crafting, preparing, to prolong that excitement about the day as much as I can. SO, that's why I DIY. Not because I'm anal about details, not because I think most people will even notice, not because if my wedding doesn't have hand-calligraphied envelopes I'll JUST.DIE., but because I truly love expending energy towards what will undoubtedly be the best day of my life.
mush over, hope you liked the bracelets :)
They turned out perfect! So gorgeous! And I love that you are spending time DIY-ing your wedding. You only do this once (ideally), and it goes by so fast. Savor every bit of it, girl! :) and I would totally hand write everything if I had your penmanship. ;)
ReplyDeleteThese are so incredibly cute! And I think I have some extra floral wire floating around at home from other crafting project from my wedding...hmm.
ReplyDeleteLove them and LOVE that you're making so many of the gifts and decor for the wedding. Some people will notice and some won't - but, it's special to you and that's what matters.
ReplyDeleteBracelets are super cute! And like others said - if you enjoy DIYing it, then go for it! That's all that matters.
ReplyDeleteGood bridesmaid gift idea, and yours turned out great! I wish I had done more DIY stuff like this.
ReplyDeleteYour bracelets are adorable! I am sure your bridesmaids will love them :)
ReplyDeleteThat all makes perfect sense. I think you are going about all of this the right way. You're getting married because you're in love with M, not because you're in love with the idea of a wedding. No one can accuse you of anything different.
ReplyDeleteI'm envious because I did have a DIY wedding, but I soon learned how overwhelmed I was by everything. It wouldn't have been as beautiful if it weren't for my mom. Ha!
Oh my gosh, Kelly, these turned out AMAZINGLY! I love that you're so creative! I think it's great!
ReplyDeleteThese are absolutely beautiful and I'm sure they're even more important and special to your bridesmaids because you made them.
ReplyDeleteLove these bracelets!! And love that you are taking the time for details- I always notice those things :)
ReplyDeleteThese are so cute! Thank you for the tutorial, I will certainly be trying my hand at these for presents! As for DIY, I'm sure it saves you some money too. I think it's great that you're capable of doing so many personal touches for such a personal day. And trust me, I taught myself how to do caligraphy for my wedding invites back when I was engaged too - you're not crazy!
ReplyDeletelove these! will have to try!
ReplyDeleteSo adorable! Love these!
ReplyDelete