
Woops.
Well, I finally uploaded some "project" pictures and figured it'd be a good time to talk about it.
I have to say, if you ever have a chance to take a Community Education class in an area you're interested in, do it. Not that I am, by any means, an expert in photography, but I can't tell you how nice it is to have at least a loose concept of how to "fix" my photos, now. Low light, but don't want to use your flash? Raise the ISO! Your photos have a golden, yellowy hue to them? Because you haven't changed your white balance! I'll show you some of the difference in the photos I took.
NONE of these have been touched with an editing program. This just goes to show you how much you can effect your photos just using your camera!
Before I show you some photos, here are some basic settings.
1. Spot Metering

When you turn your camera on, and all the settings appear on the back, you should see an icon that resembles the one above. You want your camera on Spot, ideally, and if not possible- Partial.
My camera (since it's only a Rebel T3) doesn't have "spot" metering, the best I could do was Partial.
Why is this important: This function is how you choose which part of the photo the camera focuses on. In evaluative, the camera decides which is most important, and focuses on that. Ever try to take a photo in front of a window, only to have the entire thing look white, and the subject dark? That's because your camera evaluates all of it equally, and it washes out the photo. '
Once you set this? leave it.
2. Picture Style

Why is this important: This effects color temperature. It'll soften wrinkles if on portrait, or make blues and greens brighter if on landscape. BUT, since you can do most of that in photoshop on the back end, it's best to leave this setting the same.
3. ISO
ISO measures the camera's sensitivity to light. It determines how much "noise" there is in the photo. The higher the ISO, the grainer the photo. The higher the ISO, the faster the shutter speed, also.
Why is this important: In low light situations, raising the ISO will brighten a photo, allowing you to shoot without a flash. (another way you can improve photos/low-light shooting is investing in a f.18, 50 mm lens. Most cameras come with a "kit" lens that shoots f 4.5 17-55 mm).
4. AWB
In the above photo of the back of a camera, do you see the little "WB" below the \/ button?
I had no idea, but changing this can radically change the outcome of your photos. If you want your whites to appear white, and not "golden", it's especially important to change this. So if you click on WB, this pops up:
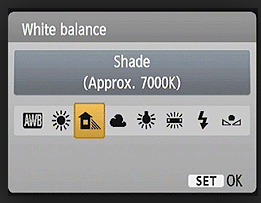
From L-R, that's auto (AWB), sun, shade, clouds, tungsten, fluorescent, flash, and custom.
Why is this important: If you want your whites, white, it's important to adjust this off auto and to what the actual settings you're shooting in. To see what I mean, just play around with it. Take the same photo in every setting and watch the colors change. (You'll see some of what I mean below)
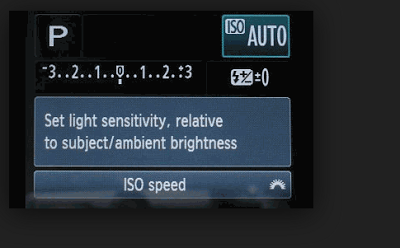
5. Exposure compensation
This effects the overall exposure of the photos. Another way to make a photo appear lighter/darker. The exposure compensation is that little bar you see below that says -3..2..1..0..1..2..+3. The "-" side will darken a photo, while the "+" side will brighten it.(Ignore the ISO explanation..it was the best photo I could find of exposure)
In practice, here's how it looks.
Our field trip last week took us to the relatively famous Minneapolis landmark, the stone arch bridge.
(ALL these photos were taken in Aperature Priority mode.)

This photo was taken by changing the "picture style" to "black and white." (I was just experimenting)

The above photo was taken with the white balance set to "cloudy" since it was, in fact, a cloudy day
Here's what the exact same photo taken using the tungsten mode:

Neat, huh?
Here's another slight difference using just one function on the camera.


Do you see how the bottom photo is slightly lighter? We were shooting the bridge on a cloudy night, which actually made it bright outside (all the lights on the buildings reflecting off the haze)...but we wanted to get those fabulous pitch black photos of the stone arch, illuminated, that you often see.
SO, to make it appear darker than it really is, we dropped our exposure down like I discussed above.
All these photos were taken on a tripod. You can see the 2nd photo above, the water looks really smooth and "fuzzy" almost.. whereas the first few photos, you can see the ripples. The difference there is the shutter speed. The slower shutter speed is also what gives the lights on the bridge that awesome "starry" effect.
This is my favorite pic from the night:

Squeee! (Fun fact, you can actually see the window to my office in this photo. No, I'm not telling which one. :P)
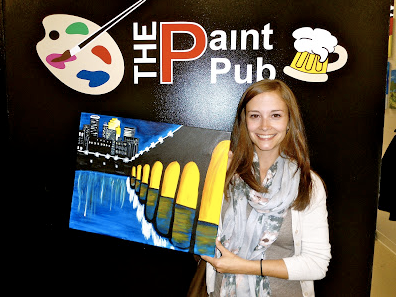
I think I'm going to frame a few of the shots to go next to this guy, that I painted at the MN Bloggers Painting Class:
I'm still thinking of doing a more detailed series on what some of these functions do, and why you want to do them. But, this is it for now. :)
So, that's a very broad overview of a few functions that can make a huge difference on your pictures!
You guys have any questions? I can try to answer them. haha. OH, and head over to Jess's blog, she was going to post some more tips and tricks today, too!
Love this! It totally just solidified the fact that I want to take a class! :)
ReplyDeleteLove these, Kelly! They look fabulous! Thanks for sharing with us!
ReplyDeletebah, good job lady! Waaaaay better than my post! haha We need to take another class.
ReplyDeleteI just read this entire post - for real! AND, I don't have a fancy camera - just an iphone! :)
DeleteGreat post! Great explanations! Isn't it great shooting in manual?! I love it. LOVE IT. I get much better photos. Haha. When i first learned, it was like a whole new world. And it took a lot of practice but now i can go from setting to setting without having to think so hard about what to do! LOL.
ReplyDeleteLOVE your favorite shot! :)
i must take a class! i have been bugging my comm ed ppl and there just isn't enough interest, i guess, doubtful but oh well. i need to just seek elsewhere- yours and jess's posts are so great! thank you! pinning it ;)
ReplyDelete