Showing posts with label home tour. Show all posts

Wednesday, June 3, 2015

HOME TOUR // KITCHEN (AGAIN)


We first moved into our house in May of 2011, and over the course of the next year or two, we did a ton of painting and settling in. None of the original colors were hideous but this was our chance to customize our first house, so we slowly wound up painting most rooms.

Here we are 4 years later and a lot of these rooms are going through a second transformation.
I'm hesitant to speak for everyone but I feel pretty confident in saying that although it was only over the course of 4 years, my design aesthetic has changed a TON from 24 to 28. I always had a soft spot for the style we ended up gravitating towards but, much like wedding planning, I found myself appreciating many different kinds of styles, which meant that to the naked eye our house looked fine, but it started to feel disjointed to me.

So, slowly, I've been tweaking rooms to bring them in line with my newly defined preference, which I've dubbed a cross between farmhouse and restoration hardware (on a NOT RH budget). Actually if we're being honest, Jenna Sue is my new design style but that's weird to explain to people. Think: neutrals, some rustic wood finishes, a touch of industrial, and natural textiles.

Most of the first floor has gotten updates with this vision in mind.. the office, well, to be blunt I'm waiting until that transforms into a nursery (NOT PREGNANT) because it's weird to do a mini in-between stage and weird to make it a nursery sans baby in utero, so for now it stays. Even though the couch got moved to the living room and I HATE HATE those shelves now. Woof. The bedroom is close to finally finished (after that last update over a year ago, HA), so I'll post about that soon, and the bathroom is going to be going through it's 2nd phase of updates too since we took down some shelves, realized we lost/tossed the original paint color, and now need to repaint it all anyway to cover the spackle marks.

But TODAY is about the kitchen! She got a fresh coat of paint, some new shelves, and new curtains. The color is Benjamin Moore, revere pewter.. I want to slather it on EVERYTHING, it is THE PEFECT greige.. all caps necessary. Thankfully there's literally 1.25 walls showing (the rest are covered by cabinets) so this was a super easy paint job. Previously we had a mini cork board we made out of wine corks, a wine rack, and a chalkboard hanging on this wall. The former and the latter were REALLY early on DIY projects, and were quite honestly, very obviously DIY, which started to bug me as I want a more grown up look. So for now it's just the shelves, but I'm thinking of re-adding a chalkboard to the right, just have to determine my materials. Enough blabbing, here she is:


Shelves were a DIY: that's galvanized steel plumbing pipe that was sprayed in an oil rubbed bronze finish. For each one, we used an end cap, a 6 inch pipe segment, and a flange (this one is black though). We then drilled each assembled bracket into a stud through 2 of the 4 holes in the flange (just left the other 2 empty, it was plenty supported with 2 as is). Used some pipe clips that wrapped around each bracket and went into the bottom of the wood to secure the shelves in case they were bumped. 4 hooks on the bottom and side holding the mugs and keys were from Target and were white, just sprayed them to match the brackets. 


Curtains are from Target as well (also come in yellow and grey). 

And let's not forget what it looked like when we moved in: 

So there's a proper little tour of our little kitchen! Someday I want a great big open kitchen with the same kind of floating wood shelves (for some of my pretty white pieces), white or grey cabinets, white subway tile... but, I love this little kitchen just the same for right now. It's where we blast music and chop veggies and talk about our day as TJ alternates between meowing for scraps and staring out the door. 

The more we tinker with the house the more I realize that even though I know this isn't my "forever" house, I'm going to have a really, really hard time leaving it..and get emotional even thinking about it. I know I offhandedly mentioned it a few times we were sorta casually looking, but after running numbers decided that rather than stretching ourselves or making an intermediary move, we're going to stay here for a few more years and really save and make sure we're ready for the next one. That means we'll undoubtedly (barring complications) be bringing home our first baby to this house. The same house that saw us move in together for the first time, get engaged, get married, lose a parent and so much more. 

I love you, little house. You've been so good to us. 

Thursday, May 28, 2015

HOME TOUR // THE GARAGE

*FTC disclosure: I was provided one free storage item from Monkey Bar Garage Storage Systems from their local dealer, Garage Solutions Minneapolis in connection with this review. All opinions are my own. 


M and I live in a little one and a half story home in a suburb of Minneapolis. 
This means we have a proportionally little garage to complement our little house. 

SO, the garage had never been a huge priority of ours in terms of beautifying and organizing, until recently when it reached max-nasty and upon pulling the car in one night, M said to me, "ACK, I need to organize the garage. This is a mess."  

Picture the perfect timing then when I was contacted by Monkey Bars Garage Storage Systems about a product review for a storage solution for our garage. Yayyy! Above you can see our previous "storage solution" (a term I use loosely), which was haphazard nails rammed into a 2 x 4 leftover from the previous owners. 

{the other side of our garage, equally a disaster}

The other side at least had some shelving, but that was organized quite haphazardly as well.

I selected the large tool yard rack, and it arrived less than a week later. So on Monday of this past 3 day weekend I approached M about hanging it. We'd been pretty busy doing house stuff all weekend- organizing closets, tossing clothes, painting the kitchen and hanging shelves (stay tuned on this one!), and cleaning, so his initial response was something more than a groan and just shy of a full fledged grunt. I told him it'd be easy and we trudged out to the garage.

Upon opening the package I found the bar (le duh), some hanging accessories and 2 brackets. Instead of mounting it to the old 2 x 4, we pulled down the old board to keep a lower profile and so tools wouldn't bump the car as we drove in.


I skimmed over the instructions and relayed the info to M who replied, "wait, that's it? Ok..." (the lack of readily apparent difficulty was met with heavy skepticism by M, who by now knows with house projects, nothing is as easy as it looks).

But nope, it seriously was that easy. Each bracket got 2 screws with washer heads, and the bar itself slid through one hole and into the other and was secured by those little push-button locking devices.


It seriously took 10 minutes. We spent more time tinkering around with the multiple styles of hanging accessories to determine how best to hang all our tools, and we didn't even use every hanging bar. The accessory pieces just kind of "clip" on the bar and are held by a tiny lip that catches on the bottom or back end.


If anything, this bar is too nice for our garage. I told M we need to keep a running list of "fixtures and appurtenances" to take down or make sure to keep out of any future purchase agreement because they're coming with us.

Now all our tools have a nice little home.

This of course spurred M to say, "aw screw it, let's just clean up the rest of the garage right now."
So we grouped fishing, outdoorsy stuff, and yard stuff together and tossed a bunch of scrap wood.


We still need to borrow the neighbor's push broom to sweep it out, but now it's actually become a place I feel comfortable storing some "nice" "outdoorsy" things vs. a place where things that we don't care if they get filthy land. 


So THANK YOU Monkey Bars Storage Systems and Garage Solutions Minneapolis (LOCAL company, FTW!), for helping us organize and clean up our garage!

I'll definitely be keeping them in mind for when we have a bigger garage someday that I can fill with useful (and PRETTY) storage items (like these beautiful garage cabinets/work space area. Swoon.) Getting excited over garage organization.. does this mean I'm officially old?

M and I hung some pretty sweet shelves in our kitchen this weekend too, which has me itching to properly photograph and update the kitchen home tour post, so stay tuned for that!

Tuesday, December 23, 2014

DIY INDUSTRIAL FARMHOUSE TABLE

Sometimes trolling pinterest leads to a false sense of confidence regarding your woodworking and furniture making abilities. 
Other times it finally inspires you to try something you otherwise wouldn't have.
After oogling farmhouse tables on pinterest for eons, last weekend M and I decided to take action. 
There was one small problem- we didn't want to invest TOO much money in one since in a future home, we know we'd want to have a much larger table for entertaining. That being said, our current table wasn't cutting it. 

Here it is again, as a reminder. Lots of crap on it for special effect: 


We actually bartered with the previous owners for this table, and got them to leave it behind. It fit the space well: since we don't have an actual dining room, it's just kind of butted up against the wall. It was fine for the two of us.. or even four people (we'd pull it away from the wall to seat 4 around the table), but any more than that and we were doing a "move all the furniture out of the living room, drag up a folding table, connect the two for one giant table" song and dance. No bueno. 

So, after hearing dozens of bloggers rave about the kreg jig - I decided I was brave enough to con Matt into a weekend project with me. A kreg jig is a small tool that allows you to drill pocket holes in wood. In other words, it's the preferred method to join a bunch of plans of wood together seamlessly from below without any nails showing. At first we discussed just covering our old table with wood to use it as a "form" for the table. I was a bit nervous to build something from scratch. As he was drifting off to sleep he said we should look at salvage yards for a metal base. That got my wheels turning, so as he snoozed.. I scoured pinterest for a game plan. 

Lo and behold I found this!


There were several tutorials on Pinterest on how to build an industrial pipe base table. They were modeled after a West Elm table that runs $2,000. O_O. 

The above pin used a butcher block counter top, but we wanted the look of planked wood. So, after spending some time over coffee sketching out plans and dimensions and calling Home Depot, we were off for supplies. 

The best part about this table was, most of the pipe segments we needed were already pre-cut lengths. This means the only one we had to have cut was the long support pipe that ran the length of the table- which Home Depot cut for us and threaded the end of the pipe for free. Our shopping list for pipe and wood went like this: 

  • 5 2x6 planks of wood cut to 30"
  • 1 1x3 plank of wood cut to 4 segments of 28" (to brace under the table top for added stability)
  • 4 3/4 inch pipe at 8 inches
  • 4 3/4 inch pipe at 18 inches
  • 8 floor flanges (4 for the feet for support, 4 to go into the bottom of the table to attach the top)
  • 4 threaded only pipe connectors (the entire piece was about an inch and a half of just threads to connect the feet to the base) 
  • 6 T-connectors
  • box of 3 inch screws for pocket holes
  • 1.5 inch screws for bottom supports
of course if you don't have stain for the wood, poly, or spray paint for the pipes, you'll need those in your desired color as well. All the pipe we bought was galvanized steel, and I wanted it darker, so we bought Rustoleum's Oil Rubbed Bronze spray paint. Total for all the supplies was just under $200. 


We took the pipes and wood home and began assembling the base. (I should note - the original post called for 18 inch pipe, a connector, and 8 inch pipe to make up the height of the pipe base. We realized that would make it essentially a bar-height table and knocked out the 8 inch pipe- which made it the perfect height!) 


Taking out that 8-inch segment meant we needed something threaded to connect the T's at the base the flanges- this is where the small "thread only" connectors came in. 

Our original plan was going to be to attach the tabletop to the base as it was sitting above- in other words, that support brace wouldn't have been seen since it would've sat 2 inches below the tabletop. We realized the feet didn't feel sturdy without some braces, so we flipped the entire thing upside down (you'll see in the finished pic) and it worked wonderfully! 


{sanding the planks}
Before we screwed all the wood together using pocket holes, I beat the wood up a bit with a crowbar and hammer to give it an aged/weathered look.
{you can see the pocket holes above, each one has a screw in it connecting it to its neighbor board}

We also added some cross support underneath in the form of some 1x3 boards cut to 28 inches, so they came just short of the edges of the table. 

Next comes stain and poly. We only did one coat of red mahogony stain, wiped off pretty quick after application, to give us this look. Then comes the test of patience. Dry, light sand, poly.... dry... light sand.. poly. We ended up doing 4 coats of poly since this is going to get a lot of use, so we had to wait a few days to attach it to the base. 

We brought it upstairs for assembly, attached the top to the base, and added some carpet samples underneath the floor flanges to prevent scratching. If it's wrong to admit that I find myself just staring at it, then I don't' want to be right. 


We added about 15 inches in length compared to our old table, which still leaves plenty of room on that wall for it to sit..and only about 3-4 inches of width, which doesn't make much of a difference either in terms of space. 

While we were at it, I picked up some new chair fabric and recovered all the chairs. They were covered in a black felt-like material that held TJ's hair way too well and were gross. Slapped this pretty new fabric over it, and it really all ties together wonderfully.


This project actually got done 2 weekends ago. This past weekend, just in time for hosting Christmas (my real motivation for getting this done when we did!) we made a matching bench for the other side of the table. No more borrowing chairs or dragging inside our patio chairs- the table now comfortably seats 6 (7 in a pinch, since 3 could fit on the bench easily). 

Just wanted to stop in and share. :) 

I also may have an update soon regarding Zipper Merge Asshole and an update to my anticlimactic update: hint, it involves a police lineup. 

Wednesday, May 14, 2014

SPRING TO DO LIST // AND AN AWESOME PAINTING TOOL


This is our house.
Fear not, we do not have a heart plaque above the mailbox. That would be where the address is, le duh. Although I don't think I've ever really said what city I live in, let alone my street, one can never be too careful. ;)
We toured this house in April 2011, and it was the first of the day. We eventually went on to tour another house that we put an offer in on, and lost. When that fell through, we started thinking about this little guy again...and I'll be perfectly honest in saying one of the things that made it so easy to overlook initially was some of their heinous paint decisions. (Including the burnt orange kitchen with red-toned cabinets and forest green counters..and the fact that almost every room on the first floor was painted the same shade of brown...aside from the bathroom, which was a two tone poopy disaster).

We've slowly painted every.single.room. in the house (minus the master) but the last and perhaps the most daunting is the exterior paint. Initially I hated both the brown and the red. The above photo makes it look quaint-my cousin who shoots for City Pages took it in 2012 on Mother's Day, so it was on its best behavior. It being the house. But in reality, the brown is a chalky non-brown, brown. Also, I'm not sure if I'd hate the red as much if they hadn't painted the gutters and ALL OF THE TRIM red. It looks like a child's doll house.

I'd be lying if I said it hasn't grown on me a little.. but with the itch to take on a larger home project has come the itch to finally do away with the chalky brown.
There's been a trend in our area of DARK grey houses with a so-dark-it-looks-black navy blue trim/shutters (I knew no matter the color I always wanted to add shutters at some point).

I was wondering if there was a janky way to photoshop so I could experiment with colors when I googled "exterior paint color visualizer" and up came the most brilliant (no this is not sponsored but I still almost peed my pants) tool from Sherwin Williams called the Color Visualizer.

Not only can you photoshop on exterior (and interior!) colors to your heart's content, but once you paint the color on, after a second or two, the details of the exterior of your house show through. Meaning it's not like a giant chunk of color like it would be in MS Paint. It's pretty much the coolest thing ever.
I spent a good portion of last night tinkering with different combinations. Here were some of my contenders:


Although I kind of liked the teal triangle above the door in the above photo, M wasn't a fan.
I also realize this color could look outdated really quick so after I came up with the following combination, I think we found a winner: 

To keep the house from looking TOO "Pleasantville" We can add some more color with plants in the window boxes.
I also may drive around and see what the houses in our area do in terms of matching window boxes with shutters and the different colored pitched triangle (which actually seems to be pretty popular) to see if maybe I should work in a 3rd complimentary color somewhere, still. The door is also red, so I'll definitely be repainting that but that will absolutely be some sort of a brighter color!

We also want to strip and stain the deck this summer... since the previous owners used some terrible paint-stain hybrid..which means the deck has been CHIPPING since we moved in and now is greyed and patchy and awful. It'll be a bitch of a project, but it needs to be done.

Home ownership: it ain't all fun and games, people.

Monday, March 24, 2014

HOME TOUR // MASTER BEDROOM REMIX

 
I've hyped up this bedroom redo quite a bit that I hope it lives up to expectations. 
A little bit of back story. 
Our bedroom used to be upstairs- we live in a 2 and a half story  house, which means the upstairs is all one room, and there's a pitched roof situation. I posted not all too long ago about the redo we did up there (holy crap was that already 2012..? I take back the "not too long ago" part...) It was better than the first iteration, but I still didn't love it. 
It wasn't a room I liked spending a lot of time in, and would procrastinate going upstairs until the MOMENT I went to bed. 
We originally put our room up there because it made sense- or so we thought- since we'd have a whole floor to ourselves and would be out of the way of any guests. 

Fast forward a few years, and my friend Dana asked to store her furniture in our basement guest room while she lived in the country for a year for a judicial clerkship. She moved back right around Christmas, and with that move- reclaimed her furniture in the basement. I'd told M that eventually- there was no question- we'd be moving to the first floor guest room as our master. When babies come (not for a long time) the office will turn into a nursery, and I didn't want to schlep up and down stairs in a sleep deprived state to tend to said baby. 

SO, couple this knowledge with the timing of Dana's return to the twin cities and next thing you know M and I are looking at mattress sales right around new years. The other thing about having the upstairs bedroom, we would've been limited to a double bed-- there's no way a queen box spring would have fit. So these fortuitous events led us to purchasing a queen mattress and moving downstairs. The first floor guest room furniture then got moved to the basement. This of course triggered some "if you give a mouse a cookie" in me.. and required a remodel. 

There's still some work to be done- we need art to replace the giant flower I painted when this just served as a guest room (I have some ideas, I just need to execute), and we need something for above the bed. I've been very picky and am holding out for the right piece. I also want to get a real, huge, grown up rug that extends out from under all sides of the bed. Our current rug is an IKEA leftover from the last rendition of the living room that is only on my side of the bed. lastly, the biggest unknown is the paint color-- as you'll see the headboard kind of blends with the current color, which I don't love.. but we haven't decided how to handle it (accent wall?).

Without further ado- the bedroom as it it today :)

Source List:
  • Side tables: Target (exact no longer online, but HERE are some similar)
  • Headboard: Overstock (exact no longer online, but HERE is a similar)
  • Lamps: IKEA
  • Ladder: antique store find
  • Wood pallet sign/wood & mason jar decor: DIY (stained the wood chunk, used plumbing accessories to hang the mason jars)
  • Burlap letter pillows: etsy wedding gift
  • Gold tray: antique store find
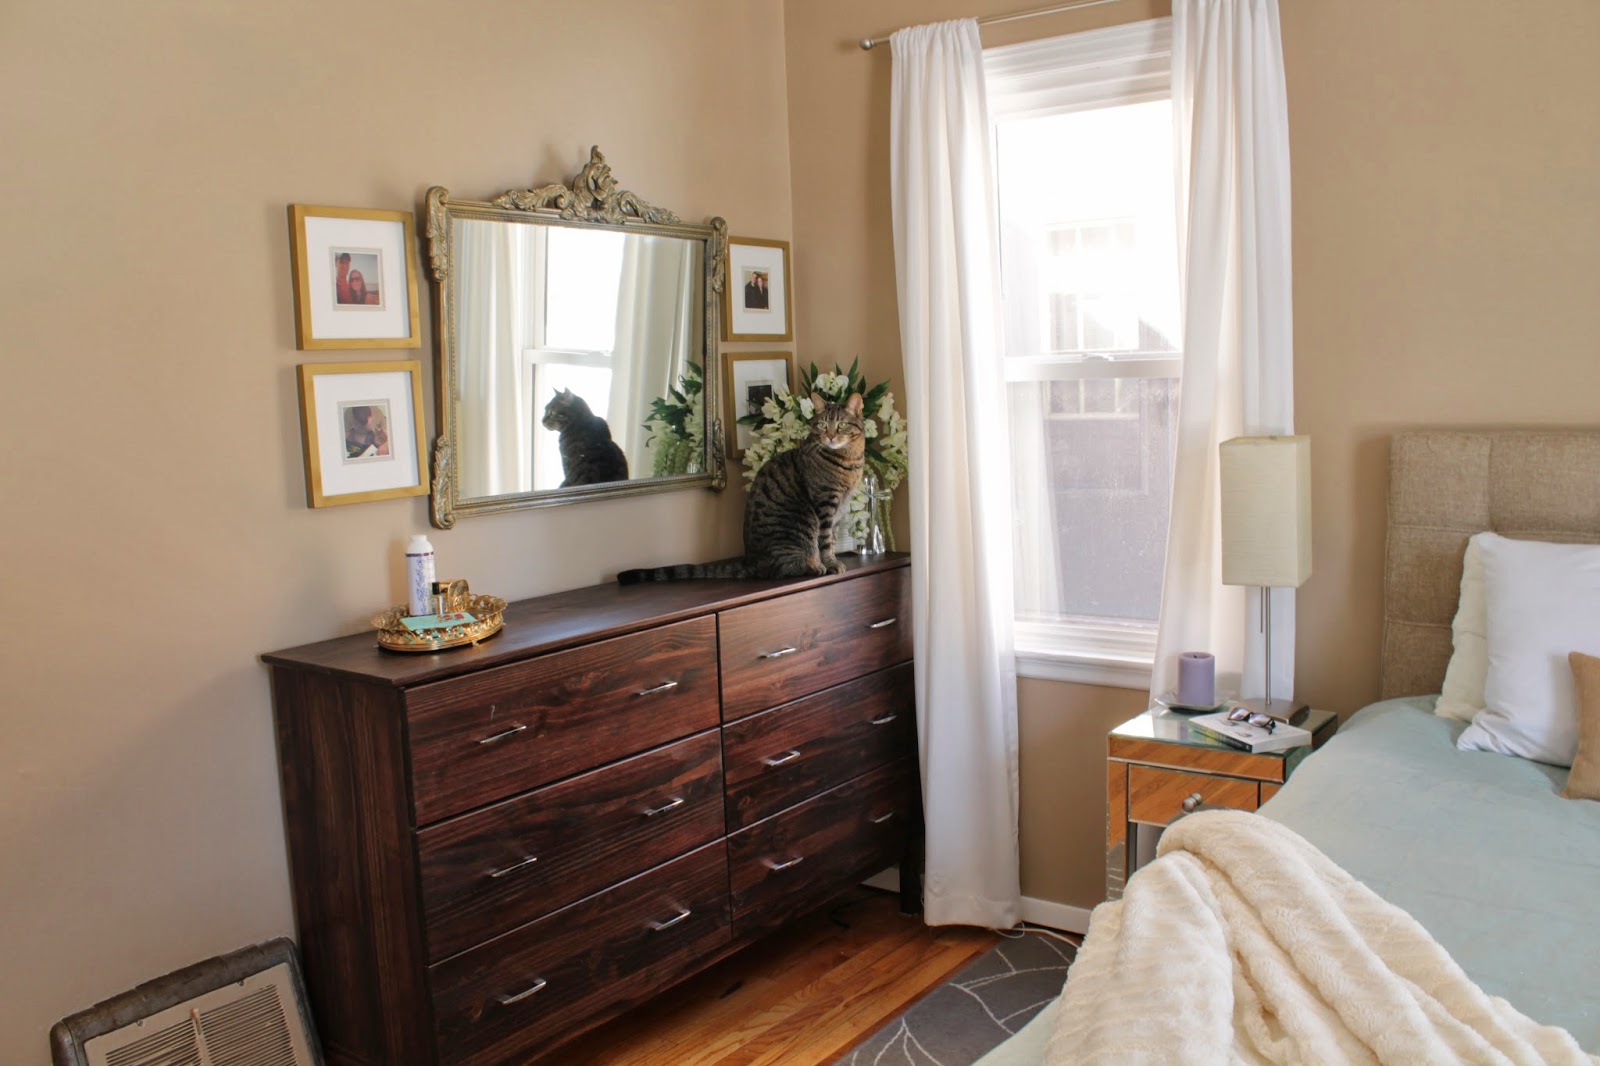
  • Large gold mirror: free from my uncle, used to live in our living room and was black- I sprayed it out gold and kind of love that some of the black sort of peeks through, it really makes the details pop
  • 4 gold frames: $3 Target clearance frames I sprayed gold, used burlap to back the Instagram printed photos inside the 5x5 matting
  • Floral arrangement is fake from Michaels (vase is from Target)- my cat eats real flowers so we're like 80 year olds with a lot of fake flowers in our house. 
  • Last but not least- would you believe me if I told you that dresser is the same as this one? : 
I assume you'd say yes simply because it's the same shape, but this may be one of the DIY's I'm MOST proud of.. EVER. I stumbled on a website called Ikea Hackers (google it, it's amazing) and saw the 3 drawer version of this dresser stained and hacked in so many beautiful ways.

We needed a long dresser that would tuck in perfectly to a nook created by the wall, and a heat register that juts out from the wall. It had to be no larger than 60 inches, but as close to that as possible. This dresser was about 58 inches and perfect RAW wood at IKEA.

We stained it a red mahogany color which is just insanely gorgeous in real life, polyed it, and then assembled the whole thing in the room. Finally, we swapped out the tacky wood knobs for the same drawer pulls we used in our kitchen-(I love that they tie in to the mirrored side tables so well because they're shiny and mirror-y, too).. we just had to drill an extra hole per drawer front, and voila- a custom, beautiful dresser for $150.--> MY FAVORITE PART. Dressers I was willing to "settle" for were still $250-$300 and still didn't totally fit in our room, with the natural wood ladder and other accents. (Actually we lucked out the two ended up so close in color! I stained the mason jar scrapwood the same color as the dresser, too, but the ladder was thankfully very close in color as it was!)

I'm obsessed. It has the natural elements I wanted with a more modern edge with the drawer pulls and clean lines.

So there you have it, our bedroom so far. It's my favorite room in the house (a close tie with the living room, actually). I finally feel like I'm hitting my groove with "my style" and am finding I can pick out pieces and envision a whole room more clearly than I ever have been able to.

Hope you like!

Thursday, January 16, 2014

HOME TOUR // LIVING ROOM REMIX

Our living room has been through approximately 4 renditions since we moved in. I can't for the life of me find photos of #3 (in which we had a significantly less revolting couch than the slipcovered monstrosity you are about to see- that we eventually sold to Syndal!)

Let's take a walk down memory lane, shall we?
This is how she looked when we moved in.
 
We lived with the brown for about a year, I'd have to guess, before I realized just how much of our house was painted brown (the exterior, living room, hallway, bathroom, and one guest room) and the brown slowly started to feel like walls of poop closing in on me. 

We painted the walls gray, and for a while the living room looked like this: 

 It wasn't terribly offensive but it wasn't at its best yet. We putzed on other rooms, in the meantime.
(If you're noticing the presence of an additional doorway between photos 1 and 2, that's because there is one. We knocked out the wall/closed up the entryway to the basement in the kitchen to make the kitchen more usable).

We bought and sold a couch somewhere in there, and endured a brief stint with our second IKEA rug, before being handed down M's mom's old living room set- because you don't say no to nailhead trim... EVER. Only problem was I then hated the living room again. The furniture was a dark brown/green/grey color that didn't seem to match with anything.

Then came the wedding in which we were gifted an unholy amount of Target gift cards, and I took it as our opportunity to switch some items out for a little overhaul that made a huge impact. Ready for an after?

Nearly everything in this room is from Target.. and I don't even feel bad about it. Haha. Nate Berkus can do no wrong in my book, and Target has been ON POINT lately.


 (TJ just sat in the hallway as I climbed on things to take pictures with a very concerned 'wtf' face...)


Source list:
  • Bronze stamped side table 
  • Faux-wood veneer side table was also Target but isn't online anymore 
  • embroidered floral throw pillow 
  • sweater throw pillow
  • Other floral-y blue pillow was also Target
  • Est. 2013/M/K burlap pillows were an etsy wedding gift
  • Rug was also Target (but they only appear to have smaller sizes/runners left in this print)
  • Floral chairs were Target a few years ago but they always have similar styles
  • Tray/floral centerpiece on the coffee table was also Target, neither are online (same can be said for the magenta floral in the mercury glass on the side table).
  • Lamps were Target but I'm not seeing them online (similar more expensive, also pretty obsessed with these mercury glass ones).
  • The large black/linen frame, small slatted wood frame, washed out wood frame (far left), 2 stacked 4x4 (PERFECT for instagrams) frame, the 5x5 matted frame (for more dramatic IG's), and the faux-window-pane frame are all Target
  • Large canvas is from Agape Moments
  • Small canvas is from easy canvas prints
  • Small leaf sconce was from Target a few years ago, it was black and came in a 2 pack, I sprayed it out gold (and have yet to find a home for the second sconce.. maybe the master redo)
  • Silver mirrored frame on side table was a wedding gift- it's from kate spade
  • Entry way mirror was a hand-me-down from my grandma
  • Jane Austin print
  • Ampersand print
  • The rest of the room was pretty much DIY's..
I think that covers all of it!? If I missed something you have a question about let me know. This is easily my favorite room in the house, now...and it was downright magical during Christmas. My plan is to have the master give it a run for its money and I just ordered 2 of these for the bedroom:

Jazzed is an understatement. :-D

And in the spirit of keeping it real, a cat who had a vendetta against the duster...


 and the behind the scenes of where all the junk got moved to take these photos. :)